This guide will help you setup dBpoweramp for SECURE mp3 ripping.
Download and install the dBpoweramp package. From the start menu open "dBpoweramp CD Ripper".
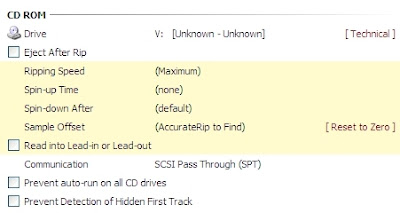
Click Options Button (top toolbar) and change the Ripping Method to Secure (Recover Errors).

Scroll down the options page and look for:
Communication: (leave as SCSI Pass Through (SPT)

Advanced option: If your CD drive supports reading into the lead / lead out, check the option Read into Lead-in or Lead-out. CD drives have a fixed offset, later in this guide the offset of the drive is found, for drives with a + offset the CD drive would have to be able to read into the Lead-out, where a drive with a - offset would have to read into the Lead-in.
By over-reading (if the drive is capable) the first or last few samples can be read from the CD, in most instances these samples are silence. Visit DRIVE FEATURES to determine the status of your CD drive.
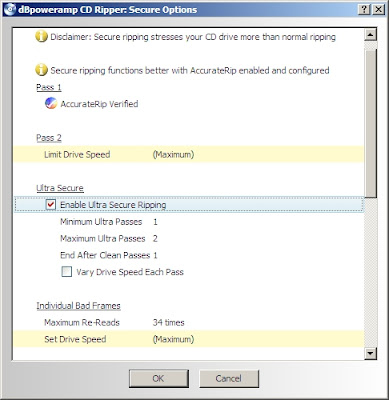
Now is time to configure the CD drive for secure ripping, click Secure Settings next to the Secure (Recover Errors) line:

The settings for Ultra Secure depend on your CD drives ability to report C2 error pointers (C2 pointers tell CD Ripper when a section of audio has errors).
If C2 pointers are supported use this ability (in other programs the recommendation might be to always disable C2 support, this is not true in CD Ripper). Before checking C2 Error Pointers for Error Detection, it is best to actually do a test with a simulated damaged audio CD: take an audio CD which is never to be used again, with a black permanent marker pen draw a triangle onto the silver side of the CD (side which is normally placed downwards into a CD player).
Place this CD in your CD drive and click Detect c2 Support, if your drive supports C2 pointers it will detect by the end of the disc - noting if a c2 pointer error is signalled right at the start then the cd drive might not be compatible (the above black marker test would signal a c2 error about 1/4 of the way through the test)
Caching For a secure ripper to work correctly the cache must be invalidated, this is normally done by reading an area larger than the drives cache, by default CD ripper sets a 1024KB cache. The cache can be detected (it is likely to be much much smaller than the default value). Detecting cache size is quite difficult, it is recommended that 3 or 4 different unscratched CDs are used to detect the value. A 'no brainer' and safe option is to leave the cache as 1024KB.
Advanced Cache Checking: To verify your CD drives cache value download Spath's Cache Explorer (CacheEx) extract contents of this zip file to C:\, next open a command prompt by selecting Start >> Run and typing Cmd.exe In the black command window which shows type:
C: (press enter)
cd \
cacheex -i -c -n 10 x: (x is the drive letter of your CD drive).
The cache value will display, or no cache detected if your CD drive does not cache.
Clear Read Cache with FUA is an option which can quickly clear the cache, it should only be used on compatible Plextor drives (the older true Plextors), there is an option to test for this feature, again only use this option on Plextor drives.
Continuing with the options, set these:
The Secure Rip Abort options will end ripping early if the disc is badly damaged, this is important as a secure ripper can sometimes try too much to recover a damaged disc, sometimes spending 2 hours on one disc, which is not overly healthy for a CD drive. A Secure Extraction Log is used to save details (to a text file) of all actions taken on a disc (which tracks had errors, where the errors were), noting that Log Filename is left as the default value. The log file is saved to the Music Folder as a text file.
Moving up the options page, to Ultra Secure:
If your drive supports C2 pointers, set as:
Minimum Ultra Passes: 1 Maximum Ultra Passes: 2 End After Clean Passes: 1
If your drive does not support C2 pointers, set as:
Minimum Ultra Passes: 2 Maximum Ultra Passes: 4 End After Clean Passes: 2
Maximum Re-Reads control how many times a 'bad' section is retried, with C2 pointer support this can be set to a higher number, such as 60. Without C2 support it is not recommended that this value be increased, as there is more of a chance of a consistent error getting through ripping.
Configuring AccurateRip
AccurateRip consists of an online database of other users ripping results, by comparing your CD rip (a small CRC of the track data) to theirs it can be known with almost certainty that the rip was free from errors. Before AccurateRip can be used it must find your drives read offset. To do so insert a popular CD, if the CD can be used AccurateRip will offer to find the offset:
Normally only 1 CD is needed, but if your CD drive does not appear in AccurateRip's main database of CD drives then 3 matching results from 3 different discs will be required. When finding the offset for your drive, it is not required to actually rip the CD. Once the offset is found it will be reported:
When AccurateRip is operating it will report a message next to a track such as 'Accurate (12)': this reports your rip matched 12 other peoples rips (the confidence number), anything above a confidence of 1 can be relied upon. On a damaged track the report might be 'Inaccurate (2)', where your rip disagrees with two other peoples Rips. If all the tracks dis-agree with AccurateRip then it is likely your CD is a different pressing to the one in AccurateRip's database.
Meta Data Finally an important part of CD Ripping, often overlooked is Metadata, quality track details and album art are important in the 'rip one - rip right'philosophy, CD Ripper uses 4 online metadata providers providing a yearly subscription is maintained (at time of writing is $5 per year), with PerfectMeta active automated metadata retrieval results are as good as possible for an automated system, occasional manual intervention might be required: If the track names are wrong, or require correction, press ALT + M to activate the PerfectMeta review page, clicking on a different provider (buttons at the top) uses all the data from that provider, or clicking on a single item shown will use that item. By default CD Ripper will embed album art inside each ripped audio file (audio format permitting) and also write a Folder.jpg file to the location of the album. Separating Insecure Tracks It is possible to separate tracks which are ripped insecurely using the DSP Effect 'Move Destination File On Error'. Add this effect to CD Ripper's active DSP effect list and configure a fixed root path (such as your Music Folder), set the naming to error\[origfilename] which will place any tracks with ripping errors into an error folder. CD Ripper must be configured to highlight these tracks: CD Ripper >> Options >> Secure Settings >> check Mark Insecure as Error. Extra Note: Taken from here. Lame has different internal encoding algorithms (as set by dBpoweramps Encoding setting in mp3 (Lame). -h higher quality, but a little slower. Recommended. -f fast mode (lower quality) For R13 dBpoweramp matches lames mode with: The official version of this guide can be FOUND HERE
Missing album art can be added quickly by: on the internet open images.google.com and type the artist name followed by the album name, a list of album art will be shown. Click one with a decent resolution to show full size, right click on the album art and select Copy. In CD Ripper click + next to the album art and choose Paste From Clipboard.
These switches are set on lame command line with 'f' and 'h' and are documented as:
Normal = Lame default
Slow = Lame High Quality
Fast = Lame Fast Mode


No comments:
Post a Comment